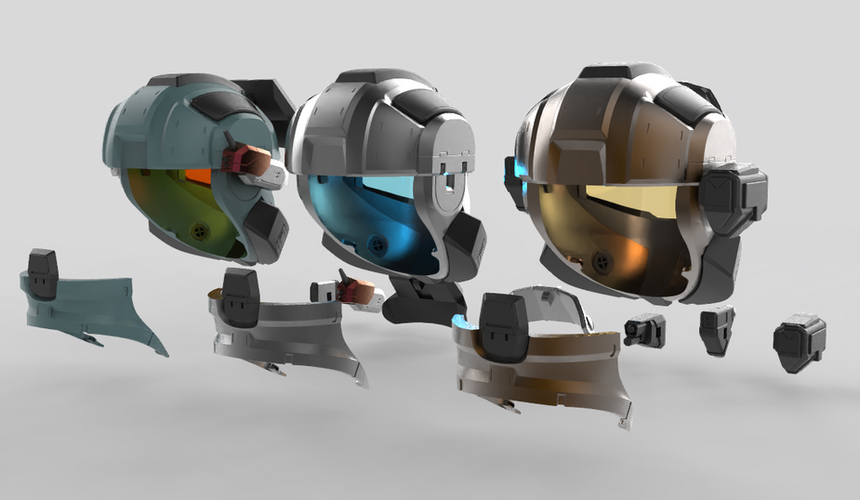
First of a new generation of helmet design.

For the past few months, I have been going back to update most of my previous helmets with free overhaul updates that added magnetic assembly, numerous attachments, electronics supports, easy visor insert systems and more. This Trailblazer helmet is the first helmet I have started since I updated my design philosophy and I couldn't ask for a better helmet to try it out on. This helmet came out incredibly clean with so much customization and functionality all in an easy to print and assemble package. For those looking for a deep dive into my design process, you can check it out here
Major Features
Magnetic Sealed Helmet

This helmet is comprised of only 5 major pieces. The top bucket and the face shield come together to leave massive quarter bucket hole with which to insert the user's head. The helmet is magnetically sealed around the head using a magnetic neck seal that also includes the rear AI Chip insert. This allows for the helmet to be sensibly sized to the user's head and to avoid a "bobble head" effect
Active Ventilation System
This helmet features multiple ventilation shafts throughout the helmet to allow for multiple channels for air-flow.
The mandible of the helmet features two removable gas filter boxes with screw-in gas filter cannisters that can be packed with a filter material of your choice.
The "Mohawk" shaft features two locations for a 40x40x10mm fan, and the upper right and left panels feature storage space for speakers, batteries, padding etc.
Overhead Attachment Compliment:
The Trailblazer helmet features an optional central attachment mount that can accommodate two different UA attachments as well as any overhead camera attachment such as a GoPro. Any attachment can be mounted onto the attachment post using your own hardware or an included, printable nut and bolt.

An alternative central attachment point allows for the magnetic attachment of the FCI-I AIRWOLF attachment and some alternative cranial pads allow for the Purrfect audio attachment.

The FCI-I AIRWOLF armor attachment features a slot for a 20x3mm disc magnet that will allow it to be fastened to the helmet via an alternative central attachment point that will hold its own 20x3mm disc magnet.

Side Mounted Attachment Compliment:

The Trailblazer helmet comes with 5 optional side helmet attachments spanning different MJOLNIR generations. All are compatible with an optional attachment rod that can easily be removed for mixing and matching different attachment compliments. CNM [5]:

CNM:

HUL:

HUL-I RS:

HUL[3]:

Easy Insert Visor System
There are two easy insert slots on either side of the visor opening. This allows for two thin PETG sheets with a mirror foil sheet between them to be inserted into the tabs and held in place. For a video tutorial of what I mean you can find that here

There is a thin printable visor template that can be used to cut out your visor sheet as well as a visor plug for those with vacuum forming machines.

Builds
I could not be happier with how this helmet came out! The build is so simple to print and assemble, that I was able to constantly break it down and build it back up with different attachments and prototype parts as I saw fit. I haven't painted a helmet in a while, but I'm thinking that this may be my next fully painted helmet. I also want to experiment with incorporating the internal electronics that this helmet was made to accommodate.
All the pieces except for the main bucket could be printed on my Ender 3's which made this helmet overall very quick to print.
The magnetically sealed neck was very secured. I placed all the magnets in their slots and assembled the all the magnetic pieces together before closing them into their slots with hot glue. This made sure that the neck sat exactly where I wanted it to sit and all the magnets would be perfectly flush to each other after the glue was added.


Comentários